Dynamics 365 Expense Management App Overview
- Ana Inés Urrutia

- 4 ene
- 3 min de lectura
In this article, we’re going to look at the Dynamics 365 Expense Management mobile app, which is an out-of-the-box app built by Microsoft. No custom build, no fancy setup — it comes ready to use as part of Dynamics 365 and is built as a Power Apps canvas app, accessed through the Power Apps mobile app.
For most of this walkthrough, we’ll visualise the app using the desktop version, simply because it’s easier to explain the structure and default screens that way. At the end of the article, we’ll switch to the mobile version so you can see how the same app behaves on a phone in a real, on-the-go scenario.
The idea behind this app is simple: make expense reporting less painful. Instead of waiting until you’re back at your laptop, you can create expenses directly from your phone. Taking pictures of receipts is a big part of this. You just snap a photo, and the app uses OCR to read the receipt and pull the relevant details into the expense line. You can also save receipts first and attach them later if you’re in a rush.
From the app, you can create expenses and expense reports, attach or remove receipts, save drafts, submit reports, or recall them if something’s wrong. Approvers aren’t left out either — they can review and approve expense reports directly from the app, which speeds things up a lot.
Even though it’s a mobile app, it’s not disconnected from Finance. Everything is still driven by Dynamics 365 Finance configurations, like expense policies, workflows, and which fields are visible. So what you see on mobile matches what’s configured in the web app. And yes, if needed, the app can also be customized.
Landing screen
From here, you can see all your expense requests in one place, including their current status, so you immediately know what’s going on without clicking around. This is basically the home base of the app. There’s also a clear button to submit a new request, which is where most users will start when adding a new expense. Simple, clean, and straight to the point — no surprises here.

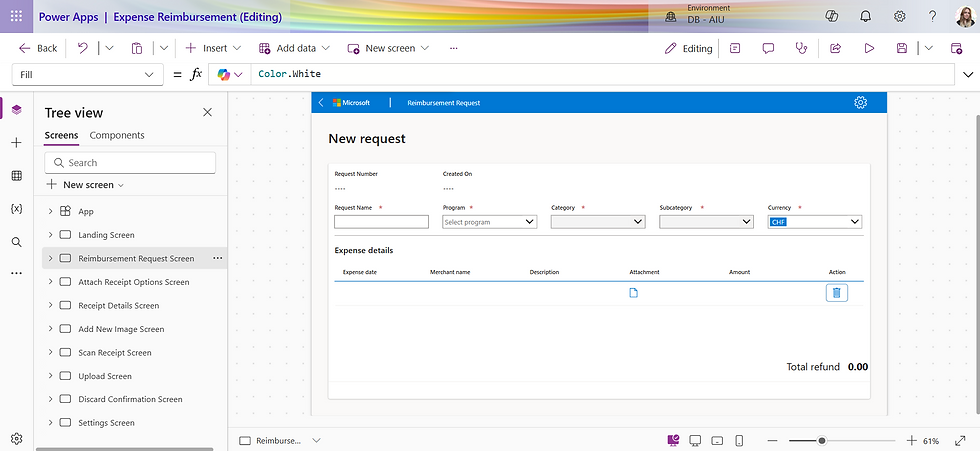
Reimbursement request screen
This screen shows the full overview of a reimbursement request. You can see key details like the request number and name, when it was created, its current status or progress, as well as the category, subcategory, and currency. Below that, you’ll find the expense details linked to the request, so everything related to that reimbursement lives in one place.
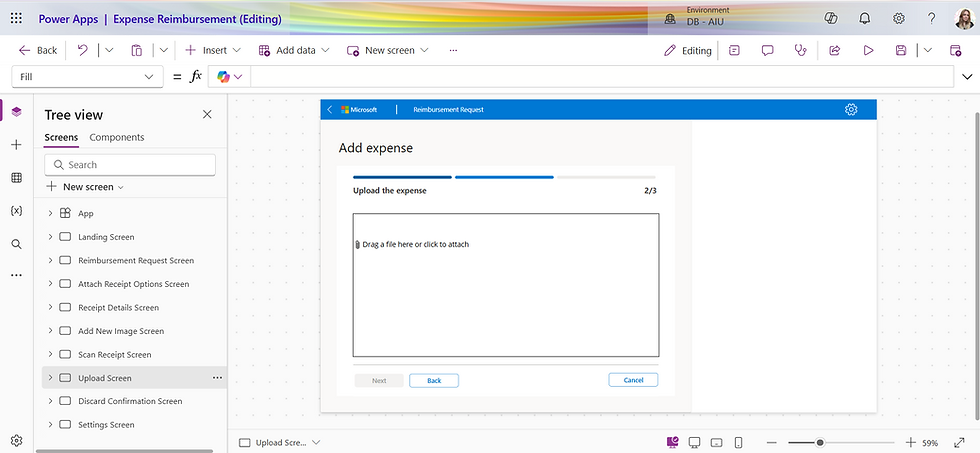
Add expense / attach receipt screen
From here, the app asks how you want to add your receipt. You can capture, scan, or attach a receipt. When you’re using the app on your phone, this is where it really shines: you can open your camera to snap or scan the receipt straight away, or attach an existing file if you already have it.

Add expense (final step)
This is the last step before submitting. The screen shows the attachment file name, expense date, merchant name, currency, and amount. Think of it as a final check — users can quickly verify that everything looks right before sending the expense for submission.

Expense upload (captured or scanned receipt)
This screen shows the receipt image that was captured or scanned. It’s a simple visual confirmation so users can clearly see what was uploaded before moving forward.

Expense upload for attachments
If the user chooses to attach a file instead of scanning or capturing a receipt, this screen handles that flow. It shows the uploaded attachment so users can confirm they selected the correct file.
Expense upload with preview
Here, users get a preview of the scanned or captured receipt along with the extracted information. This is where they can double-check that the scan worked properly and that the details make sense.

Discard changes screen
This screen appears if the user decides to cancel the reimbursement request. It lets them discard any changes made so far, avoiding accidental submissions.

Settings screen
Finally, the settings screen is where users can adjust their user experience preferences. It’s a small but useful area that lets users control how the app behaves for them.

Now let's dive into the mobile experience:


One important thing to keep in mind: this app only works if Expense Management is already fully set up in your environment. Once that’s done, this app basically becomes a mobile extension of what you already have.
Official Microsoft resources:
Dynamics 365 expense management mobile app overview | Microsoft Learn
Install and configure the Dynamics 365 expense management mobile app | Microsoft Learn
Install and open the Dynamics 365 expense management mobile app on a mobile device | Microsoft Learn
Update the Dynamics 365 expense management mobile app | Microsoft Learn
Dynamics 365 expense management mobile app FAQ | Microsoft Learn


Comentarios